CouchDB是眾多稱作NoSQL解決方案中的一員。與眾不同的是,CouchDB是一個面向文檔的資料庫,在它裡面所有文檔域(Field)都是以鍵值對的形式存儲的。域(Field)可以是一個簡單的鍵值對、列表或者是map。
CouchDB會為存儲到資料庫中的每一個文檔分配一個文檔級別的唯一標識符(id),同時每次將變動保存到資料庫中時還會分配一個修訂號(rev)。
NoSQL資料庫的出現代表著傳統的關係型資料庫的轉變,它能夠提供很多好處,當然其自身也面臨著挑戰。CouchDB為我們提供了下面的特性:
從NoSQL系統可視化嚮導中可以找到一個非常出色的工具,它能幫你決定哪一個數據存儲適合你。該指南描述了選擇資料庫系統時應該關注的三個方面(NoSQL和關係型資料庫都是如此)。在我們的項目中使用該指南篩選資料庫時會關注下面的特性:
CouchDB側重於AP(可用性和分區容忍度),這正是滿足我們的數據關注點所要尋找的資料庫(更不用說在連續的或者點對點的設備間進行數據複製的能力)。相比之下,MongoDB側重於CP(一致性和分區容忍度),像Neo4J這樣的資料庫則提供了特有的面向圖形的結構。
另一個出色的工具是這篇博客文章,它對Cassandra、MongoDB、CouchDB、Redis、Riak、Hbase和Membase做了比較。
當然,對於一個給定的項目你很可能有多個工具,換言之,這就需要明確需求並找到合適的工具以滿足這些需求。
我們將要構建一個簡單的本地事件資料庫,用於存儲一些事件以及這些事件發生的位置。我們將會把它分為兩個文檔,通過它們的文檔id將兩者關聯起來。這兩個文檔是:
(本文稍後會為這兩個文檔創建Java類)
Jcouchdb
我們將使用jcouchdb與CouchDB資料庫交互。這是一個經過良好測試並且易於使用的Java庫,它會自動地將Java對象序列化、反序列化進CouchDB資料庫。選擇jcouchdb的另一個原因是它和CouchDB自身的API非常相似。
Jcouchdb的替代方案有那些?
如果你不喜歡jcouchdb,或者想要嘗試其他的庫,那麼可選項也有很多,如:
其中有少數已經很久沒有更新了,所以,如果你要做一些測試,請確保預留一些時間解決程序的問題。
從哪兒開始呢?我們將會使用Maven3構建這個示例項目。哪怕不知道Maven也能理解代碼,但是為了構建並運行示例項目你需要安裝它。可以從Maven網站找到Maven3.
指南的這個部分假定你具有一定的Maven3知識,但是如果你不了解Maven,你可以直接使用從我們的庫中下載的pom.xml文件並直接使用它。
我們將會跳過POM創建的初始部分,但是如果需要創建POM文件的細節或者僅僅想要開始編碼可以從我們的github庫中下載它。首先要做的就是指定需要的jcouchdb和Spring組件。
<properties> <spring.framework.version>3.1.0.RELEASE</spring.framework.version> <spring-xml.version>2.0.0.RELEASE</spring-xml.version> <jcouchdb.version>0.11.0-1</jcouchdb.version> ... </properties>
在文件頂部指定版本信息的一個原因是,這樣可以很容易地一次性將一個庫(或者一組庫,如Spring)快速地更新到新版本。
<dependencies> <dependency> <groupId>com.google.code.jcouchdb</groupId> <artifactId>jcouchdb</artifactId> <version>${jcouchdb.version}</version> </dependency> <dependency> <groupId>org.springframework</groupId> <artifactId>spring-context</artifactId> <version>${spring.framework.version}</version> </dependency> <dependency> <groupId>org.springframework</groupId> <artifactId>spring-aop</artifactId> <version>${spring.framework.version}</version> </dependency> <dependency> <groupId>org.springframework</groupId> <artifactId>spring-test</artifactId> <version>${spring.framework.version}</version> </dependency> <dependency> <groupId>org.springframework.ws</groupId> <artifactId>spring-xml</artifactId> <version>${spring-xml.version}</version> </dependency> ... </dependencies> 在初始化依賴設置完成之後,我們需要為項目設置剩下的目錄結構。我們將遵循標準的Maven設置:
-src -main -java -resources -webapp -test -java -resources
設置CouchDB
完成了初始化設置之後,接下來就需要設置CouchDB資料庫了。幸運的是,有一些非常好的解決方案可以幫助我們快速地啟動並運行CouchDB。
它們都提供了免費的賬號,能夠完美的設置好資料庫,以便我們開始開發工作。 (單擊放大圖片)
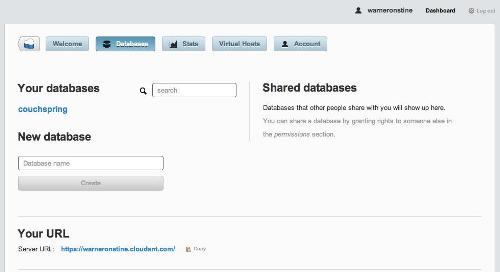
圖1.CouchAnt首頁
(單擊放大圖片)
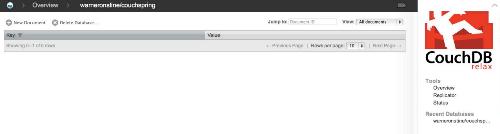
圖2.CouchAnt Futon頁面
(單擊放大圖片)
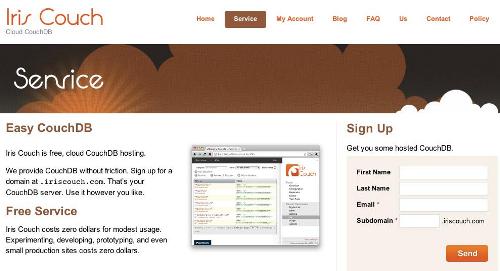
圖3。Iris Couch註冊頁面
(單擊放大圖片)
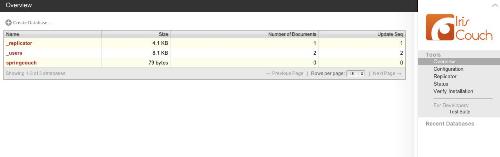
圖4. Iris CouchFuton頁面
另一個選擇是在本地機器(或主機)上安裝CouchDB。我們並不會帶你在你的操作系統上安裝它,但是在CouchDB的wiki上有一些非常好的說明。
在賬號創建完成之後(或者在設置並啟動CouchDB之後),將需要創建一個的資料庫。在我們的應用程序中選擇了couchspring作為資料庫名。你可以隨意取名,但是當我們開始配置設置時需要將其修改為對應的名字。
在CloudAnt中,可以在資料庫截圖(圖1)中創建資料庫,而對於Iris Couch來說可以直接在Futon頁面(管理CouchDB實例的用戶界面)中創建。關於管理頁面的更多信息可以在CouchDB wiki中找到。本文並不會過多的使用管理頁面,但是這是一個非常好的操作視圖的工具。

圖5.在管理頁面中創建資料庫的步驟1
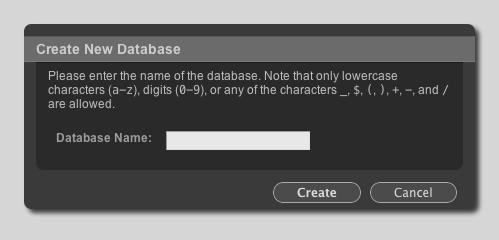
圖6.在Futon頁面中創建資料庫的步驟2
配置jcouchdb、Spring和POJOS
在新資料庫設置完成之後,我們需要:
首先,讓我們創建一些對象!
帶有自定義註解的POJOs
我們將要為事件系統創建的基礎對象是哪些?
同時,還會結合使用一些其他的對象(從外部源中抽取數據時做一些額外的數據處理):
首先,需要創建基礎類AppDocument
AppDocument.java
package com.clearboxmedia.couchspring.domain; import org.jcouchdb.document.BaseDocument; import org.svenson.JSONProperty; public class AppDocument extends BaseDocument { /** * Returns the simple name of the class as doc type. * * The annotation makes it a read-only property and also * shortens the JSON name a little. * * @return document type name */ @JSONProperty(value = "docType", readOnly = true) public String getDocumentType() { return this.getClass().getSimpleName(); } } 該對象繼承了jcouchdb自身的BaseDocument對象,同時它還提供了一種區分不同的文檔類型的方法。CouchDB並沒有提供處理這些內容的默認方式,而是將其留給了開發者,讓他們去實現各自的處理方式。我們選擇使用類名作為識別符,例如:Event對象的docType會輸出Event,而Place對象會輸出Place。
接下來需要創建Event類。
Event.java(為簡單起見,我們省略了一些域和方法)
package com.clearboxmedia.couchspring.domain; import java.util.ArrayList; import java.util.Arrays; import java.util.Iterator; import java.util.LinkedHashMap; import java.util.List; import java.util.Map; import javax.xml.bind.annotation.XmlRootElement; import javax.xml.bind.annotation.XmlElement; import org.svenson.JSONProperty; public class Event extends AppDocument { private String id; private String title; private String description; private String startTime; private String stopTime; private String venueId; private Map 這裡有幾件有趣的事。首先就是我們將會在對象中存儲的是venueId而非venue,為什麼要這樣做呢?
因為CouchDB並不是關係型資料庫,它沒有一種直接的方式去定義兩個不同文檔之間的關係,因此我們在Event對象中存儲venue的id。我們可以在event對象中存儲venue對象,但是將這些對象分開存儲更清晰,尤其對於一個給定的地點可能會有多個事件。因此,我們將會提供一個動態的獲取器,僅在我們需要的時候才會檢索venue對象,而不是存儲關係。我們將會在查詢文檔部分介紹這如何實現。[todo: 動態查詢]
現在,我們來定義Place類。
Place.java
package com.clearboxmedia.couchspring.domain; import java.util.LinkedHashMap; import java.util.List; public class Place extends AppDocument { private String id; private String name; private String address1; private String address2; private String city; private String state; private String postalCode; private String lastUpdated; private Boolean active; private Location location; private String venueType; private List<String> tags; public Place() { } public String getId() { return this.id; } public void setId(final String id) { this.id = id; } public String getName() { return this.name; } public void setName(final String name) { this.name = name; } public String getAddress1() { return this.address1; } public void setAddress1(final String address1) { this.address1 = address1; } public String getAddress2() { return this.address2; } public void setAddress2(final String address2) { this.address2 = address2; } public String getCity() { return this.city; } public void setCity(final String city) { this.city = city; } public String getState() { return this.state; } public void setState(final String state) { this.state = state; } public Location getLocation() { return this.location; } public void setLocation(final Location location) { this.location = location; } public String getVenueType() { return this.venueType; } public void setVenueType(final String venueType) { this.venueType = venueType; } public String getPostalCode() { return this.postalCode; } public void setPostalCode(final String postalCode) { this.postalCode = postalCode; } public String getLastUpdated() { return this.lastUpdated; } public void setLastUpdated(final String lastUpdated) { this.lastUpdated = lastUpdated; } public Boolean getActive() { return this.active; } public void setActive(final Boolean active) { this.active = active; } public List<String> getTags() { return this.tags; } public void setTags(final List<String> tags) { this.tags = tags; } } 我們不再詳細介紹其他的輔助對象Description 或者 Location,因為它們實在是太簡單了。如果你對它們感興趣,可以從GitHub倉庫中檢出它們。
在配置之前,需要創建一些即將使用的類。JsonConfigFactory用於json數據(CouchDB)和Java類之間的映射,CouchDbServerFactory為將要連接的伺服器創建新的實例。
JsonConfigFactory.java public class JsonConfigFactory { /** * Factory method for creating a {@link JSONConfig} * * @return {@link JSONConfig} to create */ JSONConfig createJsonConfig() { final DateConverter dateConverter = new DateConverter(); final DefaultTypeConverterRepository typeConverterRepository = new DefaultTypeConverterRepository(); typeConverterRepository.addTypeConverter(dateConverter); // typeConverterRepository.addTypeConverter(new LatLongConverter()); // we use the new sub type matcher final ClassNameBasedTypeMapper typeMapper = new ClassNameBasedTypeMapper(); typeMapper.setBasePackage(AppDocument.class.getPackage().getName()); // we only want to have AppDocument instances typeMapper.setEnforcedBaseType(AppDocument.class); // we use the docType property of the AppDocument typeMapper.setDiscriminatorField("docType"); // we only want to do the expensive look ahead if we're being told to // deliver AppDocument instances. typeMapper.setPathMatcher(new SubtypeMatcher(AppDocument.class)); final JSON generator = new JSON(); generator.setIgnoredProperties(Arrays.asList("metaClass")); generator.setTypeConverterRepository(typeConverterRepository); generator.registerTypeConversion(java.util.Date.class, dateConverter); generator.registerTypeConversion(java.sql.Date.class, dateConverter); generator.registerTypeConversion(java.sql.Timestamp.class, dateConverter); final JSONParser parser = new JSONParser(); parser.setTypeMapper(typeMapper); parser.setTypeConverterRepository(typeConverterRepository); parser.registerTypeConversion(java.util.Date.class, dateConverter); parser.registerTypeConversion(java.sql.Date.class, dateConverter); parser.registerTypeConversion(java.sql.Timestamp.class, dateConverter); return new JSONConfig(generator, parser); } } 該類會創建一個生成器,它將Java類(Event或Place)轉換成對應的json,而解析器執行相反的過程。在typeMapper(生成器和解析器都會用到它)中有幾個關鍵點需要注意,特別是基礎類型和鑒別器域。
typeMapper.setEnforcedBaseType(AppDocument.class)僅會轉換繼承自AppDocument類的文檔。
typeMapper.setDiscriminatorField("docType")將使用docType域和值來鑒別不同的文檔類型。可以自由地將該域修改為其他的名字,但是這需要在AppDocument類中改變方法和json映射。為了刷新內存,可以參考下面的方法:
@JSONProperty(value = "docType", readOnly = true) public String getDocumentType() { return this.getClass().getSimpleName(); } 要注意的最後一個點是typeMapper.setPathMatcher(new SubtypeMatcher(AppDocument.class)),它會自動查找子類型從而確保我們在繼承自AppDocument的對象間轉換。可以為檢索或查詢資料庫的幾個jcouchdb方法調用提供自己的解析器,但是在本教程不打算探討那些內容。
既然有了我們需要的類,是配置spring上下文的時候了。我們將我們的CouchDB特有的配置項分離到couchdb-config.xml中。
couchdb-config.xml
<beans xmlns="http://www.springframework.org/schema/beans" xmlns:xsi="http://www.w3.org/2001/XMLSchema-instance" xmlns:tx="http://www.springframework.org/schema/tx" xmlns:util="http://www.springframework.org/schema/util" xmlns:context="http://www.springframework.org/schema/context" xsi:schemaLocation="http://www.springframework.org/schema/beans http://www.springframework.org/schema/beans/spring-beans-3.1.xsd http://www.springframework.org/schema/tx http://www.springframework.org/schema/tx/spring-tx-3.1.xsd http://www.springframework.org/schema/util http://www.springframework.org/schema/util/spring-util-3.1.xsd http://www.springframework.org/schema/context http://www.springframework.org/schema/context/spring-context-3.1.xsd http://www.springframework.org/schema/lang http://www.springframework.org/schema/lang/spring-lang-3.1.xsd"> <context:annotation-config /> <bean id="properties" class="org.springframework.beans.factory.config.PropertyPlaceholderConfigurer" /> <bean id="jsonConfigFactory" class="com.clearboxmedia.couchspring.json.JsonConfigFactory"/> <bean id="jsonConfig" factory-bean="jsonConfigFactory" factory-method="createJsonConfig"/> <!-- If my db requires username/password, I will need to set up a Principal --> <bean id="couchPrincipal" class="org.apache.http.auth.UsernamePasswordCredentials"> <constructor-arg value="${couchdb.username}" /> <constructor-arg value="${couchdb.password}" /> </bean> <bean id="serverFactory" class="com.clearboxmedia.couchspring.couch.CouchDbServerFactory" /> <bean id="couchDbServer" factory-bean="serverFactory" factory-method="createCouchDbServerInstance"> <constructor-arg value="${couchdb.url}"/> <constructor-arg name="credentials" ref="couchPrincipal" /> </bean> <bean id="systemDatabase" class="org.jcouchdb.db.Database"> <constructor-arg ref="couchDbServer"/> <constructor-arg value="couchspring-dev"/> <property name="jsonConfig" ref="jsonConfig"/> </bean> </beans> 我們需要做的第一件事就是使用
現在,我們已經配置好一切,是時候編寫一些測試了。
在深入探討視圖創建之前,先從一些基礎測試開始,如:創建、更新、檢索和刪除。因為,在每一個測試中我們都會對它們做一些事情。下面是CouchSaveTest類的定義,對於其他的測試來說也是如此。
CouchSaveTest.java (header) @RunWith(SpringJUnit4ClassRunner.class) @ContextConfiguration("/root-context.xml") public class CouchSaveTest { @Autowired protected Database database; ... } 第一個註解@RunWith告訴Maven使用SpringJUnit4ClassRunner運行該測試(不是標準的JUnit類運行器)。這樣下一個註解@ContextConfiguration("/root-context.xml")才能為這個測試啟動一個Spring上下文。該上下文會載入所有的CouchDB 實體、POJOs和它們的JSON註釋以及會自動將視圖更新到CouchDB伺服器的CouchDBUpdater。在下面的Views部分我們將會介紹最後一個註解。
最後,我們告訴Spring將資料庫自動裝配到該測試類中,使我們能夠使用它。
Document creation **文檔創建
無論在哪種類型的資料庫存儲系統中,創建新紀錄的能力(本例中是文檔)都是首要步驟之一。 使用jcouchdb的API如何實現這些呢?
CouchSaveTest.java (testEventSave()) @Test public void testEventSave() { Event document = new Event(); document.setTitle("Test"); assertTrue(document.getId() == null); database.createDocument(document); assertTrue(document.getId() != null); } 這裡,我們創建了一個新的Event對象,然後將其作為參數調用了database.createDocument()方法。之後JsonConfigFactory會將我們的域映射到CouchDB文檔。[插入屏幕截圖]
文檔的檢索和更新
CouchSaveTest.java (testEventSave_Update()) @Test public void testEventSave_Update() { Event document = database.getDocument(Event.class, "2875977125"); assertTrue(document != null); document.setDescription("Testing out save"); database.createOrUpdateDocument(document); Event newdocument = database.getDocument(Event.class, "2875977125"); assertTrue(document != null); assertTrue(document.getDescription().equals("Testing out save")); } 該方法實際上測試了兩件事情,首先通過調用Event document = database.getDocument(Event.class, "2875977125");檢索文檔,檢索時傳入了文檔的id——“2875977125”。其次還測試了更新方法database.createOrUpdateDocument(document);,它的作用正如其名,或創建一個新的文檔,或更新一個已有的文檔(意味著如果在資料庫中能夠找到匹配該id的文檔時就會更新它)。
CouchSaveTest.java (testEventSave_Exists2()) @Test(expected = IllegalStateException.class) public void testEventSave_Exists2() { Event document = database.getDocument(Event.class, "2875977125"); assertTrue(document != null); database.createDocument(document); assertFalse(document.getId().equals("2875977125")); } 如果我們試圖創建一個已經存在的文檔,最後一個測試會拋出一個異常(注意,我們沒有使用createOrUpdateDocument()方法)。
文檔刪除
刪除文檔和創建、更新文檔一樣簡單。
CouchDeleteTest.java (testEventDelete()) @Test public void testEventDelete() { Event document = database.getDocument(Event.class, "3083848875"); assertTrue(document != null); database.delete(document); try { document = database.getDocument(Event.class, "3083848875"); } catch (Exception e) { assertTrue(e instanceof org.jcouchdb.exception.NotFoundException); } } @Test(expected = org.jcouchdb.exception.NotFoundException.class) public void testEventDelete_NotExists() { Event document = database.getDocument(Event.class, "-2"); assertTrue(document != null); database.delete(document); document = database.getDocument(Event.class, "-2"); assertTrue(document == null); } 這兩個測試調用了delete()方法分別對存在的和不存在的文檔進行了刪除,第二種情況會拋出NotFoundException異常。
現在已經介紹完基礎的CRUD操作,那麼接下來需要做一些稍微複雜的工作。通過更多的方式查詢資料庫,而不僅僅是通過要查找的文檔的id。在本文中我們僅會探究視圖的冰山一角,因為它們可以非常複雜。關於視圖的更多內容可以在CouchDB wiki以及在線版的CouchDB: 權威嚮導中找到。
視圖介紹
首先,CouchDB視圖究竟是什麼,它如何工作?
視圖是過濾或查詢資料庫中數據的一種方式。視圖通常使用JavaScript編寫,當然使用其他語音也可以編寫視圖,但那是另一話題,我們並不會在此進行介紹。每一個視圖都將文檔內的鍵映射到值。直到文檔存取時才會更新視圖索引,但是如果你願意,你也可以通過外部腳本改變這個行為。當查詢設計文檔中的某一個視圖時該文檔中的所有視圖都會被更新。
設計文檔
在介紹視圖創建之前我們應當討論如何自動上傳應用(並保持視圖最新)。所有的視圖都捆綁到一個設計文檔。本例中我們將有兩個設計文檔:
org.jcouchdb.util.CouchDBUpdater類會自動地創建這兩個設計文檔,該類是在couchdb-services.xml文件中配置的。
couchdb-services.xml <beans xmlns="http://www.springframework.org/schema/beans" xmlns:xsi="http://www.w3.org/2001/XMLSchema-instance" xmlns:tx="http://www.springframework.org/schema/tx" xmlns:util="http://www.springframework.org/schema/util" xmlns:context="http://www.springframework.org/schema/context" xsi:schemaLocation="http://www.springframework.org/schema/beans http://www.springframework.org/schema/beans/spring-beans-2.5.xsd http://www.springframework.org/schema/tx http://www.springframework.org/schema/tx/spring-tx-2.5.xsd http://www.springframework.org/schema/util http://www.springframework.org/schema/util/spring-util-2.5.xsd http://www.springframework.org/schema/context http://www.springframework.org/schema/context/spring-context-2.5.xsd"> <context:annotation-config /> <bean id="systemUpdater" class="org.jcouchdb.util.CouchDBUpdater" init-method="updateDesignDocuments"> <property name="createDatabase" value="true"/> <property name="database" ref="systemDatabase"/> <property name="designDocumentDir" value="designdocs/"/> </bean> </beans>
CouchDBUpdater會監聽designdocs目錄中的變化,同時自動地將這些變化推到配置的CouchDB資料庫。
那麼designdocs目錄實際上包含什麼內容呢?
-designdocs -event -allByDate.map.js -allByParentId.map.js -allByVenueId.map.js -list.map.js -place -list.map.js
實際上每一個目錄都映射到CouchDB中的一個設計文檔。
(點擊放大圖片)
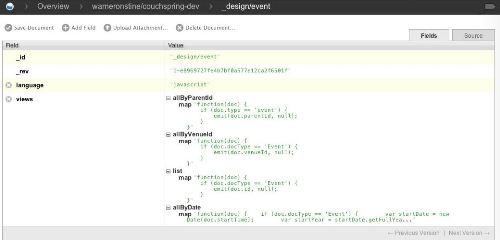
圖7 DesignDocs事件
很好,接下來就讓我們編寫這些視圖。
我們的第一個視圖
下面是一個簡單的視圖,它會查找所有的“event” 類型的文檔。
function(doc) { if (doc.docType == 'Event') { emit(doc.id, doc); } } 該視圖會簡單的返回所有具有docType域並且該域值為Event的文檔的id。讓我們稍微檢查一下它做了什麼。第一行是一個JavaScript函數定義,它僅接受一個doc參數。然後就能夠檢查存儲在文檔內的值(本例中是doc.docType)。最後,調用了emit函數,它有兩個參數key和value,其中value可以為null。在本例中,key是doc.id域,value是整個文檔。
在接下來的幾個視圖示例中,emit函數才是我們實際上用到的查詢資料庫的方法。關於emit,我們需要理解的另外一關鍵點是,它會對返回的文檔按照key值進行排序。
下面是調用list視圖的測試用例。
CouchViewTest.java (testListingQuery()) @Test public void testListingQuery() { String viewName = "event/list"; ViewResult results = database.queryView(viewName, Event.class, null, null); assertNotNull(results); assertEquals(27, results.getRows().size()); } 通過venue id檢索events
為了方便使用,首先需要創建的視圖之一就是通過關聯的venueId檢索給定事件集合的視圖。為此,需要編寫一個key為venueId、值為document的視圖(儘管jcouchdb的函數並沒有嚴格的需要)。那麼,該視圖是什麼樣的呢?
function(doc) { if (doc.type == 'Event') { emit(doc.venueId, {doc}); } } 它和之前編寫的那個簡單視圖非常相似,但是這次從應用程序中調用該視圖進行查詢時需要傳遞一個venueId。
CouchViewTest.java (testQueryByVenueId()) @Test public void testQueryByVenueId() { String viewName = "event/allByVenueId"; ViewAndDocumentsResult 此處關於如何調用視圖的關鍵區別之一就是使用queryViewAndDocumentsByKeys()方法傳入了viewName、映射的Event類以及要查詢的鍵(這種情況下只會查詢出鍵值為指定venueId的事件)。
通過日期查詢事件
這兩個視圖都比較簡單。而通過日期查詢這種稍微複雜一點功能的如何實現呢?首先,我們需要定義視圖。
function(doc) { if (doc.docType == 'Event') { var startDate = new Date(doc.startTime); var startYear = startDate.getFullYear(); var startMonth = startDate.getMonth(); var startDay = startDate.getDate(); emit([ startYear, startMonth, startDay ]); } } 現在,我們如何調用這個函數呢?
[todo: 在java中調用視圖的代碼示例]
從事件中檢索venue的動態查詢
CouchViewTest.java (testQueryByDate()) @Test public void testQueryByDate() { String viewName = "event/allByDate"; Options opts = new Options(); opts.startKey(Arrays.asList(2013, 7, 11)); opts.endKey(Arrays.asList(2013, 7, 11)); ViewAndDocumentsResult 此處有一個名為Options的新對象,通過它可以指定想要傳入視圖的查詢選項。在本例中,我們提供了一個startKey和一個endKey去檢索對象集合。需要注意的一件事情就是,你要返回或匹配的數據需與傳入數據的類型保持一致。在本例中處理的是int類型,所以傳入的鍵必須是int類型的域。當然順序也是鍵,我們依次傳入了年、日、月從而匹配視圖中的年、日、月。
那麼,endKey是什麼呢?實際上,endKey參數允許我們指定查詢的範圍。在本例中我們選擇了相同的日期,但是可以很容易地選擇不同的值從而返回更多或更少的文檔。CouchDB會簡單地依次比較每一個鍵,直到再沒有匹配的數據時才會返回結果文檔集合。
[火星人 ] CouchDB是什麼?為什麼我們要關注它?已經有851次圍觀
