Firefox 中的 Find 命令可以在 Web 頁面的主體中定位用戶指定的文本。該命令是一個易於使用的工具,大多數用戶通常都可以很好地使用該工具。但是,使用更強大的類似 Find 的工具有時可以更輕鬆地定位文本。本文將介紹如何構建這種工具,通過檢測鄰近文字的顯示和消失更快地隔離 Web 頁面中相關的文本。
Firefox 中自帶的文本搜索功能提供了實用的可以突出顯示鄰近搜索詞和短語的功能。附加的 Firefox 擴展可用於合併正則表達式搜索與其他文本高亮顯示功能。本文將提供向 Firefox 中添加自定義文本搜索界面所需的工具和代碼。使用 Greasemonkey 用戶腳本和一些自定義演算法,您可以將 grep -v 函數添加到文本搜索中 — 也就是說,在第二個搜索詞不在附近時高亮顯示第一個搜索詞。
要求
硬體
用較舊(2002 年以前)的硬體在典型 Web 頁面中進行文本搜索幾乎可以瞬間完成。但是,本文提供的代碼在設計時沒有考慮高速執行,並且可能要求使用較快的硬體才能在大型 Web 頁面中按照用戶滿意的速度執行。
軟體
本文的代碼是為了結合使用 Firefox V2.0 和 Greasemonkey V0.7 而開發的。使用比它們更高的版本需要測試並且可能需要修改才能確保功能性。作為 Greasemonkey 腳本,本文提供的代碼應當可以在支持 Firefox 和 Greasemonkey 的任何一個操作系統中運行。我們在 Microsoft® Windows® 和 Linux® Ubuntu V7.10 版本中進行過測試。
  |
Greasemonkey 和 Firefox 擴展
對 Web 頁面執行用戶修改是 Greasemonkey 履行的任務,並且本文提供的代碼將使用 Greasemonkey 框架來搜索和高亮顯示相關文本。有關 Greasemonkey Firefox 擴展,請參閱 參考資料。
此 Greasemonkey 腳本的設計目的演示
熟悉 UNIX grep 命令及其常用 -v 選項的人知道如何將不可缺少的 grep 用於從文件提取相關文本行。遵守 UNIX 簡單性原則的文本文件通常按照逐行的格式存儲文本,這樣可以輕鬆地找到靠近在一起的文字。-v 選項將輸出未找到指定文本的行。
與文本文件不同的是,Web 頁面通常用標籤和瀏覽器呈現到行中的其他標記分隔文本。各種不同的瀏覽器窗口大小使您很難根據期望的行位置來隔離鄰近文本。表、鏈接和其他文本標記也使您很難隔離位於 “同一行” 的文本。
本文中的演算法旨在解決這些難題,提供類似於 grep 的簡單功能,並使用工作原理類似於 grep 的 -v 選項的函數。這將允許用戶查找文本的某個詞,然後只高亮顯示不包含另一個不同詞的條目。圖 1 顯示了這種情況的示例。

在圖像的上半部分中,腳本高亮顯示了搜索文本 “DOM”。在下半部分中,注意如何只高亮顯示前三個 “DOM” 條目,因為在極為接近第三個 “DOM” 的位置找到了第二個搜索文本 “hierarchy”。
考慮圖 2。
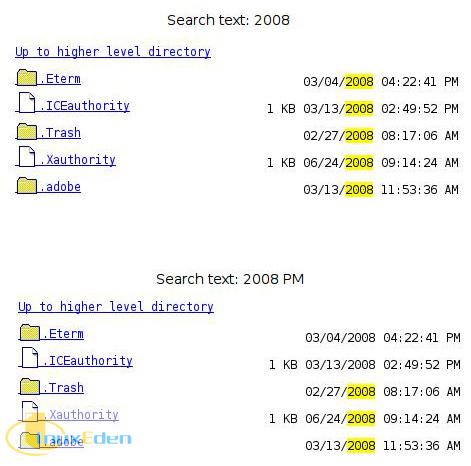
該圖的第一部分顯示所有 2008 條目,而第二部分由於 -v 關鍵字 PM,因此只顯示中午前的條目。繼續閱讀獲得全部信息以及如何實現此功能的更多示例。
|
greppishFind.user.js Greasemonkey 用戶腳本
介紹 Greasemonkey 編程環境的獨特之處不在本文討論範圍之內。假定您熟悉 Greasemonkey,包括如何安裝、修改和調試腳本。要獲得關於 Greasemonkey 及如何開始編寫自定義用戶腳本的更多信息,請參閱 參考資料。
一般而言,greppishFind.user.js 用戶腳本在載入頁面時啟動,在輸入特定組合鍵后提供文本區域,並且根據用戶輸入的文本執行高亮搜索。清單 1 顯示了 greppishFind.user.js 用戶腳本的開頭部分。
// ==UserScript== // @name greppishFind // @namespace IBM developerWorks // @description grep and grep -v function-ish for one or two word searches // ==/UserScript== var boxAdded = false; // user interface for search active var dist = 10; // proximity distance between words var highStart = '<high>'; // begin and end highlight tags var highEnd = '</high>'; var lastSearch = null; // previous highlight text window.addEventListener('load', addHighlightStyle,'true'); window.addEventListener('keyup', globalKeyPress,'true'); |
在定義描述用戶腳本及其函數、全局變數和高亮標籤的必要元數據之後,將添加 load 和 keyup 事件偵聽程序以處理用戶生成的事件。清單 2 詳細說明了負載事件偵聽程序所調用的 addHighlightStyle 函數。
function addHighlightStyle(css) { var head = document.getElementsByTagName('head')[0]; if( !head ) { return; } var style = document.createElement('style'); var cssStr = "high {color: black; background-color: yellow; }"; style.type = 'text/css'; style.innerHTML = cssStr; head.appendChild(style); }//addHighlightStyle |
該函數將用相應的高亮顯示的信息在當前的 DOM 結構中創建一個新節點。在本例中,它是簡單的黑底黃字文本屬性。清單 3 顯示了另一個事件偵聽程序 globalKeyPress 以及 boxKeyPress 函數的代碼。
function globalKeyPress(e) { // add the user interface text area and button, set focus and event listener if( boxAdded == false && e.altKey && e.keyCode == 61 ) { boxAdded = true; var boxHtml = "<textarea wrap='virtual' id='sBoxArea' " + "style='width:300px;height:20px'></textarea>" + "<input name='btnHighlight' id='tboxButton' " + "value='Highlight' type='submit'>"; var tArea = document.createElement("div"); tArea.innerHTML = boxHtml; document.body.insertBefore(tArea, document.body.firstChild); tArea = document.getElementById("sBoxArea"); tArea.focus(); tArea.addEventListener('keyup', boxKeyPress, true ); var btn = document.getElementById("tboxButton"); btn.addEventListener('mouseup', processSearch, true ); }//if alt = pressed }//globalKeyPress function boxKeyPress(e) { if( e.keyCode != 13 ){ return; } var textarea = document.getElementById("sBoxArea"); textarea.value = textarea.value.substring(0,textarea.value.length-1); processSearch(); }//boxKeyPress |
捕捉每次擊鍵並且偵聽特定組合是 globalKeyPress 的目的。按下 Alt+= 組合鍵后(即,按住 Alt 鍵的同時按下 = 鍵),將把搜索框的用戶界面添加到當前 DOM 中。此界面包含輸入關鍵字的文本區域和 Submit 按鈕。在添加新條目后,需要通過 getElementById 函數選擇文本區域以正確設置焦點。然後添加事件偵聽程序以處理文本區域中的擊鍵,並且在單擊 Submit 按鈕后執行搜索。
清單 3 中的第二個函數將處理文本區域中的每次擊鍵。如果按下 Enter 鍵,文本區域的值將刪除新行並且執行 processSearch 函數。清單 4 詳細說明了 processSearch 函數。
function processSearch() { // remove any existing highlights if( lastSearch != null ) { var splitResult = lastSearch.split( ' ' ); removeIndicators( splitResult[0] ); }//if last search exists var textarea = document.getElementById("sBoxArea"); if( textarea.value.length > 0 ) { var splitResult = textarea.value.split( ' ' ); if( splitResult.length == 1 ) { oneWordSearch( splitResult[0] ); }else if( splitResult.length == 2 ) { twoWordSearch( splitResult[0], splitResult[1] ); }else { textarea.value = "Only two words supported"; }//if number of words }//if longer than required lastSearch = textarea.value; }//processSearch |
每次搜索都存儲在每次調用 processSearch 時都要刪除的 lastSearch 變數中。刪除后,如果只有一個查詢詞或者如果需要 twoWordSearch 函數或 grep -v 函數,則使用 oneWordSearch 高亮顯示搜索查詢。清單 5 顯示了關於 removeIndicators 函數的詳細信息。
function removeIndicators( textIn ) { // use XPath to quickly extract all of the rendered text var textNodes = document.evaluate( '//text()', document, null, XPathResult.UNORDERED_NODE_SNAPSHOT_TYPE, null ); for (var i = 0; i < textNodes.snapshotLength; i++) { textNode = textNodes.snapshotItem(i); if( textNode.data.indexOf( textIn ) != -1 ) { // find the appropriate parent node with the innerHTML to be removed var getNode = getHtml( textNode ); if( getNode != null ) { var temp = getNode.parentNode.innerHTML; var reg = new RegExp( highStart, "g"); temp = temp.replace( reg, "" ); reg = new RegExp( highEnd, "g"); temp = temp.replace( reg, "" ); getNode.parentNode.innerHTML = temp; }//if correct parent found }//if word found }//for each text node }//removeIndicators |
使用 removeIndicators 無需手動遍歷 DOM 樹,而是使用 XPath 快速提取文檔中的文本節點。如果某個文本節點包含 lastSearch 文本(最近高亮顯示的詞),則 getHtml 將查找相應的父節點,並且刪除高亮顯示的文本。注意,將 innerHTML 的提取與 innerHTML 的分配合併為一個步驟將帶來各種各樣的問題,因此需要將 innerHTML 臨時指定為外部變數。清單 6 是 getHtml 函數,該函數將詳細展示如何查找相應的父節點。
function getHtml( tempNode ) { // walk up the tree to find the appropriate node var stop = 0; while( stop == 0 ) { if( tempNode.parentNode != null && tempNode.parentNode.innerHTML != null ) { // make sure it contains the tags to be removed if( tempNode.parentNode.innerHTML.indexOf( highStart ) != -1 ) { // make sure it's not the title or greppishFind UI node if( tempNode.parentNode.innerHTML.indexOf( "<title>" ) == -1 && tempNode.parentNode.innerHTML.indexOf("btnHighlight") == -1) { return( tempNode ); }else{ return(null); } // the highlight tags were not found, so go up the tree }else{ tempNode = tempNode.parentNode; } // stop the processing when the top of the tree is reached }else{ stop = 1; } }//while return( null ); }//getHtml |
在遍歷 DOM 樹搜索 innerHTML 以插入高亮顯示的標籤時,必須忽略兩個特定節點。不應當更新包含 title 和 btnHighlight 的節點,因為這些節點中的更改將導致文檔無法正常顯示。當找到正確的節點時,無論 DOM 樹中的父節點有多少個,都返回節點並刪除高亮顯示。清單 7 是向文檔中添加高亮顯示的第一個函數。
function oneWordSearch( textIn ) { // use XPath to quickly extract all of the rendered text var textNodes = document.evaluate( '//text()', document, null, XPathResult.UNORDERED_NODE_SNAPSHOT_TYPE, null ); for (var i = 0; i < textNodes.snapshotLength; i++) { textNode = textNodes.snapshotItem(i); if( textNode.data.indexOf( textIn ) != -1 ) { highlightAll( textNode, textIn ); }//if word found }//for each text node }//oneWordSearch |
再次使用 XPath,oneWordSearch 將處理每個文本節點以找到查詢。找到后,將調用 highlightAll 函數,如清單 8 所示。
function highlightAll( nodeOne, textIn ) { if( nodeOne.parentNode != null ) { full = nodeOne.parentNode.innerHTML; var reg = new RegExp( textIn, "g"); full = full.replace( reg, highStart + textIn + highEnd ); nodeOne.parentNode.innerHTML = full; }//if the parent node exists }//highlightAll function highlightOne( nodeOne, wordOne, wordTwo ) { var oneIdx = nodeOne.data.indexOf( wordOne ); var tempStr = nodeOne.data.substring( oneIdx + wordOne.length ); var twoIdx = tempStr.indexOf( wordTwo ); // only create the highlight if it's not too close if( twoIdx > dist ) { var reg = new RegExp( wordOne ); var start = nodeOne.parentNode.innerHTML.replace( reg, highStart + wordOne + highEnd ); nodeOne.parentNode.innerHTML = start; }//if the distance threshold exceeded }//highlightOne |
類似於 removeIndicators 函數,highlightAll 將使用正則表達式來替換用標記高亮顯示的文本(包括高亮顯示標籤和原始文本)。
稍後在 twoWordSearch 函數中使用的 highlightOne 函數將檢查第一個詞是否距離第二個詞足夠遠,然後執行相同的替換。需要在從 XPath 語句返回的呈現文本中執行字距檢查;否則,諸如 <b> 之類的各個標記將影響距離計算。清單 9 詳細說明了 twoWordSearch 函數。
function twoWordSearch( wordOne, wordTwo ) { // use XPath to quickly extract all of the rendered text var textNodes = document.evaluate( '//text()', document, null, XPathResult.UNORDERED_NODE_SNAPSHOT_TYPE, null ); var nodeOne; var foundSingleNode = 0; for (var i = 0; i < textNodes.snapshotLength; i++) { textNode = textNodes.snapshotItem(i); // if both words in the same node, highlight if not too close if( textNode.data.indexOf( wordOne ) != -1 && textNode.data.indexOf( wordTwo ) != -1 ) { highlightOne( textNode, wordOne, wordTwo ); foundSingleNode = 0; nodeOne = null; }else { if( textNode.data.indexOf( wordOne ) != -1 ) { // if the first word is already found, highlight the entry if( foundSingleNode == 1 && nodeOne.parentNode != null && nodeOne.parentNode.innerHTML.indexOf( wordTwo ) == -1 ) { highlightAll( nodeOne, wordOne ); }//if second word is in the same parent node // record current node found nodeOne = textNode; foundSingleNode = 1; }//if text match if( textNode.data.indexOf( wordTwo ) != -1 ){ foundSingleNode = 0; } }//if both words in single node }//for each text node // no second word nearby, highlight all entries if( foundSingleNode == 1 ){ highlightAll( nodeOne, wordOne ); } }//twoWordSearch |
對 XPath 調用檢索得到的每個文本節點執行遍歷,方法與 oneWordSearch 函數中的執行方法相同。如果在當前文本節點內同時找到兩個詞,則調用 highlightOne 函數以高亮顯示距離 wordTwo 足夠遠的 wordOne 的實例。
如果兩個詞不在同一個節點中,則在第一次匹配時設置 foundSingleNode 變數。對於後續匹配,在第二次節點匹配之前,當再次偵測到單個節點時,調用 highlightAll 函數。這將確保高亮顯示第一個詞的每個實例 — 甚至第二個詞不在附近的那些詞。在循環過程中,如果隔離了最後一個 wordOne 匹配並且仍然需要高亮顯示,則執行最終檢查以運行 highlightAll。
將用以上代碼創建的文件另存為 greppishFind.user.js,繼續閱讀獲得安裝和使用細節。
|
安裝 greppishFind.user.js 腳本
打開安裝了 Greasemonkey V0.7 擴展的 Firefox 瀏覽器,並輸入 greppishFind.user.js 所在目錄的 URL。單擊 greppishFind.user.js 文件,然後應當會看到標準 Greasemonkey 安裝彈出。選擇 install,然後重新載入頁面以激活擴展。
用法示例
在將 greppishFind.user.js 腳本安裝到 Greasemonkey 中后,可以通過輸入 dom inspector 作為在 www.google.com 中的搜索查詢模擬圖 1 中所示的示例。顯示結果頁面時,請按 Alt+= 組合鍵激活用戶界面。鍵入查詢 DOM(區分大小寫)並按 Enter 鍵以查看所有高亮顯示的 DOM 條目。將查詢更改為 DOM hierarchy,您將看到如何只高亮顯示前三個 DOM 條目,如圖 1 所示。
選擇諸如 file:///home/ 或 file:///c:/ 之類的目錄清單以顯示類似圖 2 中列出的條目。您可能需要更改距離參數或者高亮顯示樣式才能得到符合搜索條件的結果。
結束語
有了以上代碼和已完成的 greppishFind.user.js 程序后,您現在已經為在 Firefox 中實現自己的文本搜索功能打下了基礎。雖然此程序主要關注某些詞與其他詞極為接近的特殊情況,但是它為以後的文本搜索選項提供了框架。
考慮根據第二搜索詞的鄰近程度為高亮顯示詞添加顏色變化。擴展 grep -v 詞的數目以逐步刪除條目。使用本文的代碼結合您自己的想法創建新的 Greasemonkey 用戶腳本,進一步增強用戶查找文本的能力。(責任編輯:A6)
[火星人 ] 增強 Firefox 中的 Find 命令已經有719次圍觀
