一、什麼是REST
REST是REpresentational State Transfer的縮寫,代表分散式超媒體系統(如World Wide Web)上的一種軟體架構體系,並不僅僅是創建Web Service的一種方法.它最早由Roy Fielding於2000年在其博士論文「Architectural Styles and the Design of Network-based Software Architectures」中提出,並定義了一些基本原則.簡單的說,放到World Wide Web上,就是所有的應用程序對象和功能都可以抽象為一種資源(Resource),並通過URI來定位並使用.因此,我們可以把符合REST原則的系統稱為RESTful.也就是說,REST是一種架構風格,而不是一個標準,你永遠不會看到W3C發布一個叫REST的Specification.
RESTful Web Service與基於SOAP和WSDL的Web Service有著很多的不同,它有著以下特點:
·將Web Service作為一種資源,並通過URI來定位
·使用HTTP中的POST、GET、PUT和DELETE方法來代表對資源的CREATE、READ、UPDATE、DELETE(CRUD)操作
·使用無狀態通信
·傳輸XML或者SON
在JAX-WS中提供了對開發和部署一個RESTful的Web Service的基本支持,即通過實現Provider介面是的Web Serivce可以對傳輸的XML消息進行完全的控制,因此我們可以在WAS CE中使用JAX-WS開發一個RESTful的Web Service.
對RESTful Web Service提供完整支持的JAX-RS Specification將會加入Java EE 6.0的大家庭中.當前的WAS CE V2.1.x是遵循Java EE 5.0的企業級應用伺服器.因此,若想使用JAX-RS開發RESTful Web Service,請關注WAS CE的後續版本.
二、開發環境設置
本文基於WAS CE的最新版本V2.1.1.2開發一個RESTful的Web Service,在開始編寫代碼之前,請確認如下的開發環境:
·Sun JDK V5.0
·Eclipse IDE for Java EE Developers - Ganymede
·WASCE Eclipse Plug-in (WEP) V2.1.1.2
此外,WAS CE使用Axis2-1.3作為JAX-WS引擎,但是由於其存在一個已知的關於HTTP Content-Type Header的問題(在Axis2-1.4中才解決), 我們需要將JAX-WS引擎切換成Apache CXF (WAS CE使用版本為V2.0.8).不用擔心,WAS CE的模塊化架構,使這個過程十分簡單,過程如下:
1. 啟動WAS CE
2. 打開Web Console:http://localhost:8080/console
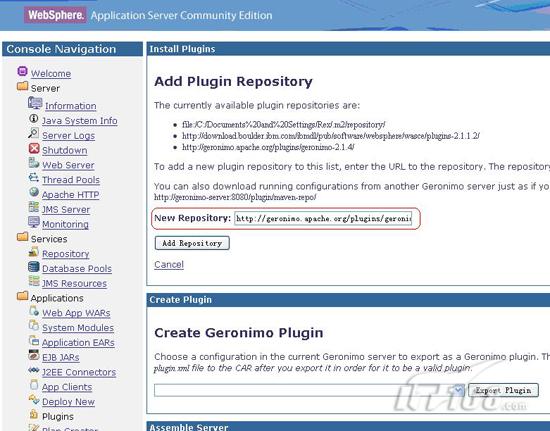
3. 進入Application -> Plugins頁面,點擊Add Repository
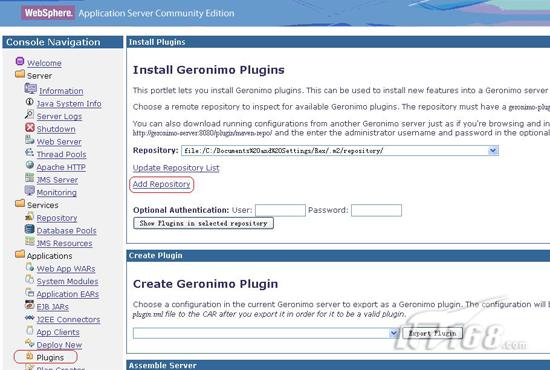
4. 由於WAS CE V2.1.1.2是基於Geronimo V2.1.4開發,我們也可以使用Geronimo的Server plug-ins.在New Repository中輸入:
http://geronimo.apache.org/plugins/geronimo-2.1.4/ 然後點擊Add Repository.
5. 選擇剛剛添加的Repository,然後點擊Show Plugins in selected repository.
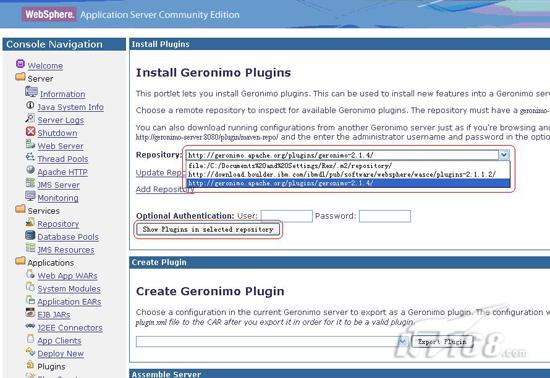
6. 勾選上以下plug-ins並且點擊install按鈕.

7. 在以上CXF相關的Plugin安裝完成之後, 我們需要更新WAS CE的配置文件,以是的WAS CE在啟動時載入CXF以代替Axis2.(注意:在更改配置文件前先要停止WAS CE伺服器)
8. 停止WAS CE后,打開<WASCE_HOME>/var/config/config.xml
去掉以下四個module的condition屬性:
<module name="org.apache.geronimo.configs/axis2-deployer/2.1.4/car" condition="…"/>
<module name="org.apache.geronimo.configs/axis2-ejb-deployer/2.1.4/car" condition="…"/>
<module name="org.apache.geronimo.configs/cxf-deployer/2.1.4/car" condition="…"/>
<module name="org.apache.geronimo.configs/cxf-ejb-deployer/2.1.4/car" condition="…"/>
增加load屬性,axis2相關的為false,cxf相關的為true:
<module name="org.apache.geronimo.configs/axis2-deployer/2.1.4/car" load="false"/>
<module name="org.apache.geronimo.configs/axis2-ejb-deployer/2.1.4/car" load="false"/>
<module name="org.apache.geronimo.configs/cxf-deployer/2.1.4/car" load="true"/>
<module name="org.apache.geronimo.configs/cxf-ejb-deployer/2.1.4/car" load="true"/>
9. 重新啟動WAS CE伺服器.
三、開發一個簡單的RESTful Web Service
1. 在Eclipse中創建一個Dynamic Web Project作為Web Service的宿主:
選擇File->New->Dynamic Web Project
輸入Project Name為HelloRestfulService
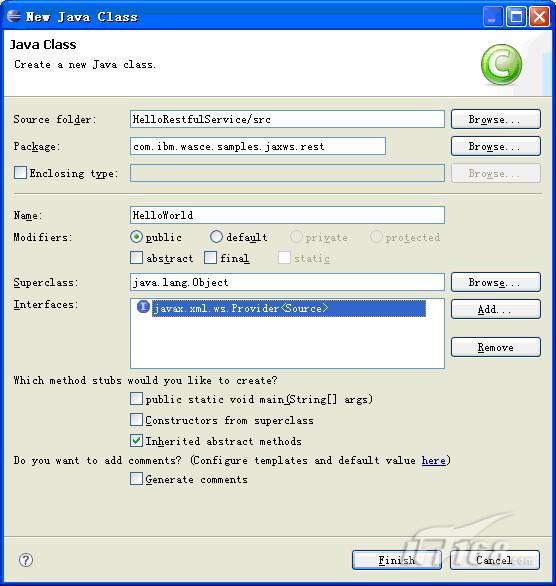
2. 右擊Java Resources: src,新建一個class,其中package、Name、Interfaces如下設置:
3. 加入如下代碼:
| package com.ibm.wasce.samples.jaxws.rest; String body = "<ns:return xmlns:ns="http://rest.jaxws.samples.wasce.ibm.com">" } catch (Exception e) { private String sayHello(String target){ |
讓我們看一看代碼中的幾個關鍵點:
a) @WebServiceProvider 表明這個Web Service實現了Provider介面,可以對XML消息進行完全的處理.
b) Provider 是這類Web Service都要實現的介面,它只有一個方法需要實現,即:
public abstractjava.lang.Object invoke(java.lang.Object arg0);
c) Source 是交換信息的載體:
當Source對象為空時,表示是一個GET Request. 這種情況下,所有信息是被拼成一個URI的參數,並傳到這個URI對應的Web Service.
否則,是一個POST Request,其內容會包括在一個Source對象內;
另外,Response的內容也要放到一個Source對象內.
4. 編寫web.xml
為了使我們前面編寫的Web Service能夠成功部署到WAS CE中,我們需要將如下內容加入到web.xml中:
| <servlet> <servlet-name>Hello</servlet-name> <servlet-class>com.ibm.wasce.samples.jaxws.rest.HelloWorld</servlet-class> </servlet> <servlet-mapping> <servlet-name>Hello</servlet-name> <url-pattern>/Hello</url-pattern> </servlet-mapping> |
注意,這裡只是借用了<servlet>和<servlet-mapping>標籤來幫助暴露Web Service,並不是真是要求這個Web Service必須要實現HttpServlet介面.
5. 部署,運行並測試這個Web Service
右擊這個HelloRestfulService工程,選擇Run As -> Run on Server,會將其部署到WAS CE中,當Status欄變為Synchronized時,在Console中會有類似如下信息顯示:

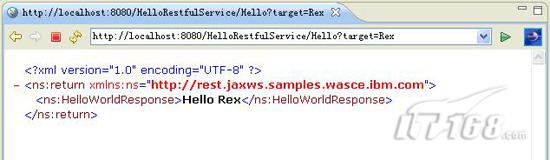
通過訪問如下地址,測試使用GET方式調用RESTful Web Service返回的結果:
http://localhost:8080/HelloRestfulService/Hello?target=Rex
四、開發一個簡單的RESTful Web Service Client
1. 創建一個Dynamic Web Project作為Client
選擇File->New->Dynamic Web Project
輸入Project Name為HelloRestfulClient
2. 新建一個testget.jsp,加入如下內容:
| <form method="POST" action="HelloGetMethodRequester"> Target Name: <input type="text" name="target"> <input type="submit" value="Submit"> </form> |
這個JSP用來為HelloGetMethodRequester Servlet提供參數.
3. 創建HelloGetMethodRequester Servlet,加入如下內容:
| protected void doPost(HttpServletRequest request, HttpServletResponse response) throws ServletException, IOException { String queryRequest = "http://localhost:8080/HelloRestfulService/Hello?target=" target; try { |
在這個Servlet中我們用到了commons-codec-1.3.jar和commons-httpclient-3.0.1.jar兩個包,因此我們需要將它們加入到Build Path中:

這兩個包在WAS CE的如下目錄中可以找到:
<WASCE_HOME>repositorycommons-codeccommons-codec1.3commons-codec-1.3.jar
<WASCE_HOME >repositorycommons-httpclientcommons-httpclient3.0.1commons-httpclient-3.0.1.jar
讓我們看一看這段Servlet代碼中的一些關鍵點:
a)  創建了一個HttpClient對象,並運行了GetMethod,即使用GET請求如下URI:
"http://localhost:8080/HelloRestfulService/Hello?target=" target
b) 如果成功返回,即statusCode為200,則可以從method對象中得到返回的結果:
method.getResponseBodyAsStream()
c) 返回的結果為自定義的一段XML文檔,我們可以使用XPath來處理並輸出到頁面上.
4. 編寫部署計劃geronimo-web.xml
為使這個Web Client能夠成功部署到WAS CE中,我們還需要在geronimo-web.xml的<environment>中加入如下依賴:
| <dep:dependencies> <dep:dependency> <dep:groupId>commons-codec</dep:groupId> <dep:artifactId>commons-codec</dep:artifactId> <dep:version>1.3</dep:version> <dep:type>jar</dep:type> </dep:dependency> <dep:dependency> <dep:groupId>commons-httpclient</dep:groupId> <dep:artifactId>commons-httpclient</dep:artifactId> <dep:version>3.0.1</dep:version> <dep:type>jar</dep:type> </dep:dependency> </dep:dependencies> |
5. 部署和運行
右擊這個HelloRestfulClient工程,選擇Run As -> Run on Server,會將其部署到WAS CE中,當Status欄變為Synchronized時,表示部署成功.
在瀏覽器中打開如下頁面:http://localhost:8080/HelloRestfulClient/testget.jsp
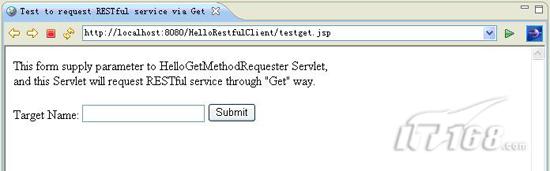
輸入"Rex",並點擊Submit,可得到如下結果:

五、總結
本文介紹了REST的基本概念,以及如何在WAS CE V2.1.1.2下開發一個RESTful Web Service和一個使用GET方式的Client.如果讀者朋友有興趣的話,也可以嘗試擴展這個Client,如增加testpost.jsp和HelloPostMethodRequester Servlet兩個文件:
- testpost.jsp包括一個文件上載框,用以上傳一個XML文件;
- HelloPostMethodRequester Servlet用於將XML文件以POST方式傳送給HelloWorld這個Service.
事實上,我們的HelloWorld RESTful Web Service已經具備了處理接收一個XML文件的能力.
六、資源鏈接
·WAS CE及Samples下載
http://www.ibm.com/developerworks/downloads/ws/wasce/
·WAS CE Eclipse Plug-in (aka WEP, WAS CE』s WTP Server Adapter)下載
http://download.boulder.ibm.com/ibmdl/pub/software/websphere/wasce/updates
·WAS CE文檔
http://publib.boulder.ibm.com/wasce/Front_en.html
·WAS CE主頁
http://www.ibm.com/developerworks/websphere/zones/was/wasce.html
[火星人 ] 使用WAS CE開發基於JAX-WS的RESTful服務已經有781次圍觀
